My name is Patrick Keisler and I have been a Microsoft SQL Server DBA for over 12 years. During that time I have been working for Wells Fargo Securities. I have gained considerable knowledge over this time in various production support duties, including performance tuning, database design, database maintenance, monitoring, and project management. I started this blog to share my knowledge of SQL Server with the hope of saving DBAs time and effort in their everyday tasks.
↧
Welcome to Everday SQL
↧
Use Powershell to Manage Idera SQL Diagnostic Manager
Idera SQL Diagnostic Manager (or as I call it "SQLdm") is a great monitoring and performance tuning tool that I was introduced to a few years ago. There are no server-side agents, so it's a very lightweight tool and good for monitoring all SQL Servers in your environment. The GUI is great for managing servers except when I need to put all monitored servers in maintenance mode. If I'm only monitoring a few servers, it's not that big of a deal. However, if I'm monitoring a hundred servers, then using the GUI to place them all in maintenance mode could take 20 or 30 minutes. Luckily for us, Idera has included a Powershell plugin for managing SQLdm. If you're not familiar with Powershell, then hop on over to Microsoft site to start learning before you get left behind. http://technet.microsoft.com/en-US/scriptcenter/dd742419.aspx. For the rest of this post, I'll assume you have some basic knowledge of how Powershell works.
You can run the SQLdm Powershell commands from any workstation that has the SQLdm console installed. For this example, I am running it directly from the repository server.
Start up a Powershell session in the Command Prompt window.
Load the SQLdm snapin.
Using the New-SQLdmDrive cmdlet, create a SQLdm drive, specifiing drive name, the SQL Server that hosts the repository and the repository database name.
New-SQLdmDrive dm TRON4\TEST1 SQLdmRepository
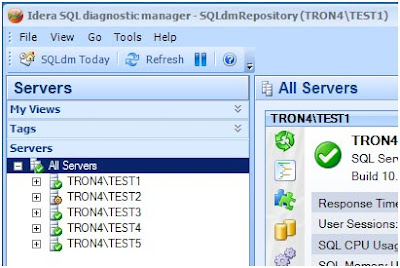
Change to the dm drive (Figure 1).
Now use the Set-SQLdmMonitoredInstance cmdlet to set a monitored server into maintenance mode until further notice (Figure 2).
Simple enough right? Yes, but it's probably just as slow to key in that same command for each server in your inventory as clicking in the GUI. Now comes the real "power" in Powershell. You can programmatically loop through all servers in your inventory to enable maintenance mode.
Start by getting a list of monitored servers from the SQLdm repository. Run the following TSQL code against the SQLdmRepository database.
In order to combine that server list with the SQLdm cmdlets, we need to add the SQL Server Powershell snapin.
Then you can use a foreach loop and the Invoke-Sqlcmd cmdlet to create a simple script to enable maintenance mode by looping through the results of that TSQL query.
You can use the same script to disable maintenance mode on all servers just by changing "-MMAlways " to "-MMNever ".
In this example, all of the monitored servers are named instances, so that's why we must use the Escape-SQLDMName cmdlet. It's allows you to specify server names that contain special characters such as: \*/:<>|?[]. If all of your monitored servers are using the default instance then you won't need to use this cmdlet.
Now let's build on this example by adding some more logic and features to our script. Let's say you are monitoring a total of 5 servers, and 1 of them (TRON4\TEST1) is always in maintenance mode for some odd reason. When you run this Powershell script to enable maintenance mode, then all 5 servers will be placed in maintenance mode. Consequently, when you run the script to disable maintenance mode, it will disable it for all 5 including the 1 server that you didn't want it disabled.
In order to prevent the TEST1 instance from being disabled, we need to create a table to store the data when we execute the script.
You can create this table directly in the SQLdmRepository database, but it can be placed in any database. When I need to customize a vendor database, I always create my own schema. This helps to prevent any issues when you upgrade to the next version from the vendor.
When we execute the Powershell script, it first checks the DBA.MaintenanceMode table for any existing rows. If the table is empty, then the script will enable maintenance mode for all servers not currently in maintenance mode.
When it's done processing each one, it writes the server name to the DBA.MaintenanceMode table.
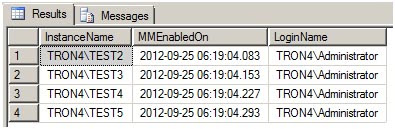
The next time the script is executed, it sees the DBA.MaintenanceMode table is not empty and selects the servers to process from that table (Figure 3).
The script processes each server and then deletes that row from the DBA.MaintenanceMode table.
What you have is a pure toggle script that only enables maintenance mode for servers not currently in that state, keeps track of that list of servers, and then disables maintenance mode for only that list of servers. In our example, TRON4\TEST1 server will always remain in maintenance mode.
Finally, create a SQL Agent job that executes this Powershell script, so the next time you need to enable maintenance mode for your entire environment you can just run the job.
The entire Powershell script is below. Please feel free to modify it as you see fit for your environment.
You can run the SQLdm Powershell commands from any workstation that has the SQLdm console installed. For this example, I am running it directly from the repository server.
Start up a Powershell session in the Command Prompt window.
Start, Run, "Powershell"
Load the SQLdm snapin.
Add-PSSnapin SQLdmSnapin
Using the New-SQLdmDrive cmdlet, create a SQLdm drive, specifiing drive name, the SQL Server that hosts the repository and the repository database name.
New-SQLdmDrive dm TRON4\TEST1 SQLdmRepository
Change to the dm drive (Figure 1).
 |
| Figure 1 |
Now use the Set-SQLdmMonitoredInstance cmdlet to set a monitored server into maintenance mode until further notice (Figure 2).
Set-SQLdmMonitoredInstance (Escape-SQLDMName -name TRON4\TEST2) -MMAlways
 |
| Figure 2 |
Simple enough right? Yes, but it's probably just as slow to key in that same command for each server in your inventory as clicking in the GUI. Now comes the real "power" in Powershell. You can programmatically loop through all servers in your inventory to enable maintenance mode.
Start by getting a list of monitored servers from the SQLdm repository. Run the following TSQL code against the SQLdmRepository database.
SELECT InstanceName FROM MonitoredSQLServers
WHERE Active = 1
ORDER BY InstanceName;
WHERE Active = 1
ORDER BY InstanceName;
In order to combine that server list with the SQLdm cmdlets, we need to add the SQL Server Powershell snapin.
Add-PSSnapin SqlServerCmdletSnapin100
Then you can use a foreach loop and the Invoke-Sqlcmd cmdlet to create a simple script to enable maintenance mode by looping through the results of that TSQL query.
You can use the same script to disable maintenance mode on all servers just by changing "-MMAlways " to "-MMNever ".
In this example, all of the monitored servers are named instances, so that's why we must use the Escape-SQLDMName cmdlet. It's allows you to specify server names that contain special characters such as: \*/:<>|?[]. If all of your monitored servers are using the default instance then you won't need to use this cmdlet.
Now let's build on this example by adding some more logic and features to our script. Let's say you are monitoring a total of 5 servers, and 1 of them (TRON4\TEST1) is always in maintenance mode for some odd reason. When you run this Powershell script to enable maintenance mode, then all 5 servers will be placed in maintenance mode. Consequently, when you run the script to disable maintenance mode, it will disable it for all 5 including the 1 server that you didn't want it disabled.
In order to prevent the TEST1 instance from being disabled, we need to create a table to store the data when we execute the script.
You can create this table directly in the SQLdmRepository database, but it can be placed in any database. When I need to customize a vendor database, I always create my own schema. This helps to prevent any issues when you upgrade to the next version from the vendor.
USE SQLdmRepository;
GO
CREATE SCHEMA DBA AUTHORIZATION dbo;
GO
CREATE TABLE DBA.MaintenanceMode(
GO
CREATE SCHEMA DBA AUTHORIZATION dbo;
GO
CREATE TABLE DBA.MaintenanceMode(
InstanceName nvarchar(256) null,
MMEnabledOn datetimenull,
LoginName nvarchar(128) null);
GOMMEnabledOn datetimenull,
LoginName nvarchar(128) null);
When we execute the Powershell script, it first checks the DBA.MaintenanceMode table for any existing rows. If the table is empty, then the script will enable maintenance mode for all servers not currently in maintenance mode.
SELECT InstanceName FROM MonitoredSQLServers
WHERE Active = 1 AND MaintenanceModeEnabled = 0
ORDER BY InstanceName;
WHERE Active = 1 AND MaintenanceModeEnabled = 0
ORDER BY InstanceName;
When it's done processing each one, it writes the server name to the DBA.MaintenanceMode table.
The next time the script is executed, it sees the DBA.MaintenanceMode table is not empty and selects the servers to process from that table (Figure 3).
SELECT * FROM DBA.MaintenanceMode
ORDER BY InstanceName;
ORDER BY InstanceName;
 |
| Figure 3 |
The script processes each server and then deletes that row from the DBA.MaintenanceMode table.
What you have is a pure toggle script that only enables maintenance mode for servers not currently in that state, keeps track of that list of servers, and then disables maintenance mode for only that list of servers. In our example, TRON4\TEST1 server will always remain in maintenance mode.
Finally, create a SQL Agent job that executes this Powershell script, so the next time you need to enable maintenance mode for your entire environment you can just run the job.
The entire Powershell script is below. Please feel free to modify it as you see fit for your environment.
↧
↧
How to Make SQL Server Listen on Multiple Ports
Have you ever needed an instance of SQL Server to listen on multiple TCP/IP port numbers but didn't know how to implement it? Well here's a quick step-by-step guide that will work for SQL Server 2005, 2008, and 2012.
Open SQL Server Configuration Manager.On the left hand side, expand SQL Server Network Configuration.
Select your instance name.
On the right hand side, right click on TCP/IP and select Properties.

Click the IP Addresses tab.
Scroll down to the IPALL section.
Make sure the TCP Dynamic Ports field is empty.
In the TCP Port field, enter each port number separated by commas.

Click OK.
A pop up message will appear stating the changes will not take effect until the service is restarted. Just click OK to close the message.
In the SQL Server Configuration Manager, on the left hand side, select SQL Server Services.
On the right hand side, right click the SQL Server service and select Restart.

After the restart is complete, SQL Server will be listening on all the port numbers you specified.
The easiest way to verify this is to look in the SQL Server Errorlog.
You will see one entry for each port number.
Server is listening on [ 'any' <ipv4> 10000].
Server is listening on [ 'any' <ipv4> 10001].
Server is listening on [ 'any' <ipv4> 10002].
Server is listening on [ 'any' <ipv4> 10001].
Server is listening on [ 'any' <ipv4> 10002].
If you happen to pick a port number that is already in use, then you will see an error like this
within the SQL Server Errorlog, and SQL Server will fail to start.
Server TCP provider failed to listen on [ 'any' <ipv4> 10000]. Tcp port is already in use.
↧
Grant Execute Permission on All Stored Procedures
Right out of the box, SQL Server makes it pretty easy to grant SELECT, INSERT, UPDATE, and DELETE to all user tables. That's accomplished by using the built-in db_datareader (SELECT) and db_datawriter (INSERT, UPDATE, and DELETE) database roles in every user database. Any user you add to those database roles will be granted those permissions.
But what if you want to grant EXECUTE permission to all of the user stored procedures. Where's the built-in database role for that? Nowhere to be found.
Oh you can create a database role, add users to that role, and grant EXECUTE permission to that role for each stored procedure that's created. But that's just not as efficient as the built-in roles, mainly because you must always remember to grant the permission to the role every time you create a new stored procedure.
Here's an easier way to create a database role that's more like the built-in roles.
This example granted EXECUTE permission to the dbo schema. Any stored procedures that are created in the dbo schema can be executed by users who are members of the db_execproc database role. You can grant the same permission to other schemas if needed.
This concept is not going to be for everyone and every database, but if you're already using the built-in database roles to manage permissions within a database then this will be a good option for you.
Create a database role and add a user to that role.
CREATE ROLE db_execproc;
GO
EXECsp_addrolemember N'db_execproc', N'User1';
GO
GO
EXECsp_addrolemember N'db_execproc', N'User1';
GO
Grant EXECUTE permission at the schema level.
GRANT EXECUTE ON SCHEMA::dbo TO db_execproc;
GO
GO
Create a new stored procedure.
CREATE PROCEDURE dbo.p_test
AS
SELECT * FROM dbo.Table1;
GO
AS
SELECT * FROM dbo.Table1;
GO
Login as the test user and execute the stored procedure.
EXEC dbo.p_test;
GO
GO
This example granted EXECUTE permission to the dbo schema. Any stored procedures that are created in the dbo schema can be executed by users who are members of the db_execproc database role. You can grant the same permission to other schemas if needed.
This concept is not going to be for everyone and every database, but if you're already using the built-in database roles to manage permissions within a database then this will be a good option for you.
For more details on database roles and grant schema permissions, check out Books Online.
GRANT Schema Permissions (Transact-SQL)
http://msdn.microsoft.com/en-us/library/ms187940(v=sql.110).aspx
http://msdn.microsoft.com/en-us/library/ms187940(v=sql.110).aspx
↧
Which SQL Instance is Killing Your CPU?
You have 5 instances running. How do you know which one is killing your CPU?
![]()
![]()
As you can see from Windows Task Manager, you have several instances of SQL installed and one of them is using nearly half of the CPU. To figure this out, you'll need to know the PID (Process ID) number.
To view the PID number in Windows Task Manager, from the menu select View, then Select Columns, and then check the box for PID. For our example, it's Process ID 1212 that's using nearly 50% of our CPU.
To view the PID number in Windows Task Manager, from the menu select View, then Select Columns, and then check the box for PID. For our example, it's Process ID 1212 that's using nearly 50% of our CPU.

So how do you correlate that PID to the SQL instance, so you can start the performance investigation? There's a couple of places you can find this information.
The first place is to look at the most recent SQL Error Log for each of your instances. One of the very first entries will be the PID value.
Server process ID is 1212.
The other place is to open the SQL Server Configuration Manager, select SQL Server Services from the left hand side, then right click on an instance and click Properties. Click the Service tab and you'll see the PID value for that instance.

Both of these methods give show you which instance is our culprit. Now you can drill into that instance to find out why it's killing your CPU.
I prefer to look for this value in the SQL Error Log because I already have Management Studio open ready to investigate the issue. Keep in mind the PID value will change every time your SQL instance is started.
↧
↧
Capture Index Usage Statistics for Better Analysis
Starting with SQL Server 2005, Microsoft introduced Dynamic Management Views to help DBAs see what's going inside of SQL Server. One of my favorite is the sys.dm_db_index_usage_stats. It collects statistics for different types of index operations and the timestamp at which it was last performed. All the DMVs are great tools; however, they all have the same drawback. They are memory resident, which means the statistics are reset any time the SQL Server service is restarted, the database is attached/detached, or it's restored.
Next we need to create the collector. This query will pull the current data from the DMV and store it in our table.
![]()
The best way to avoid losing this valuable data is to store it in a persistent table. I typically store data like this within the msdb database, but you can store in any database. Below we have created a table DBA.IndexUsageStats to hold each snapshot of the data.
USE msdb;
GO
CREATESCHEMA dba AUTHORIZATIONdbo;
GO
CREATETABLE dba.IndexUsageStats
(
SQLStartTime DATETIMENULL,
CaptureTime DATETIMENULL,
DatabaseName NVARCHAR(128)NULL,
ObjectName NVARCHAR(128)NULL,
index_name NVARCHAR(128)NULL,
index_type_desc NVARCHAR(60)NULL,
index_is_unique BITNULL,
database_id SMALLINTNULL,
object_id INTNULL,
index_id INTNULL,
user_seeks BIGINTNULL,
user_scans BIGINTNULL,
user_lookups BIGINTNULL,
user_updates BIGINTNULL,
last_user_seek DATETIMENULL,
last_user_scan DATETIMENULL,
last_user_lookup DATETIMENULL,
last_user_update DATETIMENULL,
system_seeks BIGINTNULL,
system_scans BIGINTNULL,
system_lookups BIGINTNULL,
system_updates BIGINTNULL,
last_system_seek DATETIMENULL,
last_system_scan DATETIMENULL,
last_system_lookup DATETIMENULL,
last_system_update DATETIMENULL
);
GO
Next we need to create the collector. This query will pull the current data from the DMV and store it in our table.
DECLARE@CurrentStartTime ASDATETIME,
@PreviousStartTime ASDATETIME;
SELECT@CurrentStartTime = sqlserver_start_time
FROM master.sys.dm_os_sys_info;
USETestDatabase;
INSERT msdb.DBA.IndexUsageStats
SELECT@CurrentStartTime AS SQLStartTime,
CURRENT_TIMESTAMP ASCaptureTime,
Db_name() AS DatabaseName,
Object_name(ius.object_id)AS ObjectName,
i.name ASIndexName,
i.type_desc ASIndexTypeDesc,
i.is_unique ASIndexIsUnique,
ius.*
FROM sys.dm_db_index_usage_statsius
INNERJOINsys.indexes i
ONius.object_id= i.object_id
ANDius.index_id =i.index_id
WHERE ius.database_id =Db_id()
ORDER BY ObjectName,
ius.index_id;
GO
The script can be scheduled with SQL Agent to run on a regular basis. I prefer a weekly schedule, but any recurring schedule is fine. If you have more than one user database, then you'll need to run this script for each one.
In the script we capture a bit more than just the DMV data. For example:
- SQLStartTime - The time when the SQL Server service started.
- CaptureTime - The time when the script captured a snapshot of the DMV data.
- DatabaseName, OjbectName, IndexName, IndexTypeDesc, IndexIsUnique are pretty self-explanatory.
USE msdb;
SELECTMin(SQLStartTime)AS SQLStartTime,
Max(CaptureTime) ASCaptureTime,
ObjectName,
IndexName,
IndexTypeDesc,
index_id,
Sum(user_seeks) ASuser_seeks,
Sum(user_scans) ASuser_scans,
Sum(user_lookups)AS user_lookups,
Sum(user_updates)AS user_updates
FROM DBA.IndexUsageStats
WHERE DatabaseName ='TestDatabase'
GROUP BY ObjectName,
index_name,
index_type_desc,
index_id
ORDER BY ObjectName,
index_id;
GO
These samples below were taken over a four month period and clearly show how the indexes have been utilized. It even points out some indexes (IX_ItemCodeIDand IX_PurchasedBy) that may be nothing more than overhead and could be candidates for removal. These two indexes have not been used for any seeks or scans, but SQL still needs to update them every time DML code is applied to the Purchases table.

As you can see, the more data you have to draw a conclusion about your index usage, the better you can make tuning recommendations for each of them.
↧
Customize the Management Studio Toolbar
Management Studio is great tool with almost everything you need right at your fingertips. Notice I said "almost". I like to customize the toolbars to meet my needs of doing work every day. Because being a DBA means you're busy all day long, and you don't have time to hunt through all the menus or memorize a keystroke for a special function.
![]()
The very first customization I always make is to add the "Hide Results Pane" button to the SQL Editor toolbar. This option is found under the Window menu and acts a toggle button to either show or hide the results pane for the query editor.

In SQL Server 2012 Management Studio, from the menu, select Tools, Customize, and then select the Commands tab. Select the Toolbar radio button, and just to the right of that select SQL Editor from the dropdown menu. In the Controls section, you will see each command that corresponds to the button on the SQL Editor toolbar.
![]()

To add a button to this toolbar, click the "Add Command" button. From the Categories section select Window, then select "Show Results Pane" from the Commands section, and then click OK. Remember this is a toggle button, so depending on the display state of the results pane, the button with either say "Show Results Pane" or "Hide Results Pane". When we're adding the button in the customization wizard, it always shows up as "Show Results Pane".
Now you should see the "Show Results Pane" button on the Controls list.

Make sure that control is selected and click the "Move Down" or "Move Up" button to reposition it on your toolbar. Once you have the button where you want it, then just click Close. Your toolbar has now been customized.

This will save you a few keystrokes and/or mouse clicks when you're trying to find that one thing that's buried in the Management Studio menus. And don't worry about messing anything up, if you don't like the layout of a toolbar, you can just click the Reset All button in the Customize wizard to reset the layout back to the default.
↧
Dynamically Create a Folder for Each Database
If you're a DBA like me then you're probably pretty detail-oriented and like to keep things very organized. For example, when doing database backups, I like to have a specific folder structure to hold the backup files for each database. See below:
![]()
D:\Backup\Server\Instance\MyDb1
D:\Backup\Server\Instance\MyDb2
D:\Backup\Server\Instance\MyDb3
D:\Backup\Server\Instance\MyDb2
D:\Backup\Server\Instance\MyDb3
In order to make this happen automatically, my TSQL backup jobs need to have code that will create folders when a new database is added or when the jobs are initially setup. SQL offers an undocumented extended stored procedures that allow us to create them on the fly; master.sys.xp_create_subdir.
Master.sys.xp_create_subdir will create whatever folder listing you pass it. For example, if you pass it 'D:\Backup\Server\Instance\MyDb1', it will create each of those folders. If any of those folders already exist, then it will ignore it and move on to the next one.
So if we need to create a folder for each database before running our backup job, then we can execute a block of code such as this.
DECLARE
@BaseFolder nvarchar(128)
,@DatabaseFolder nvarchar(256)
,@DbName sysname
-- Only one input parameter needed from the user.
SET@BaseFolder ='D:\Backup';
DECLARE Db CURSORFOR
SELECT name FROMsys.databasesWHERE name <>'tempdb';
OPEN Db;
FETCHNEXTFROM Db INTO @DbName;
WHILE@@FETCH_STATUS= 0
BEGIN
-- Dynamically create a folder for each database.
SET @DatabaseFolder = @BaseFolder +'\'
+CONVERT(nvarchar,SERVERPROPERTY('MachineName'))+'\'
+ISNULL(CONVERT(nvarchar,SERVERPROPERTY('InstanceName')),'DEFAULT')
+'\'+ @DbName;
EXECmaster.sys.xp_create_subdir@DatabaseFolder;
FETCHNEXTFROM Db INTO@DbName;
END
-- Clean up
CLOSE Db;
DEALLOCATE Db;
GO
On our test server we have three user databases plus the usual system databases, so we end up with a folder structure like this.

This example creates folders for backups; however, the same code can be adapted for any number of uses, and you can even pass UNC paths (\\Server\Folder\) so you can create network folders as well.
↧
How to Use xp_dirtree to List All Files in a Folder
UPDATED -- Dec 31, 2012 -- Be sure to read Part 2 of this post discussing xp_dirtree.
Last week I blogged about how to use an undocumented stored procedures to create folders. This week we need to do the opposite. We need to get a list of all files from a subfolder in order to process them. In order to do that, we'll use another undocumented extended stored procedure; master.sys.xp_dirtree. This stored procedure will display a list of every folder, every subfolder, and every file for path you give it.
![]()
Last week I blogged about how to use an undocumented stored procedures to create folders. This week we need to do the opposite. We need to get a list of all files from a subfolder in order to process them. In order to do that, we'll use another undocumented extended stored procedure; master.sys.xp_dirtree. This stored procedure will display a list of every folder, every subfolder, and every file for path you give it.
Xp_dirtree has three parameters:
- directory - This is the directory you pass when you call the stored procedure; for example 'D:\Backup'.
- depth - This tells the stored procedure how many subfolder levels to display. The default of 0 will display all subfolders.
- file - This will either display files as well as each folder. The default of 0 will not display any files.
EXECmaster.sys.xp_dirtree'D:\Backup\TRON4\TEST2\MyDb1',0,1;
The output below will show us each subfolder and every file for the given directory.

We're only concerned about the BAK files. So we'll need to create a temp table to hold the output of xp_dirtree. Then we can select only the rows that are an actual file (isfile = 1) and that have a file extension of BAK.
![]()
IFOBJECT_ID('tempdb..#DirectoryTree')ISNOTNULL
DROPTABLE#DirectoryTree;
CREATETABLE #DirectoryTree(
id intIDENTITY(1,1)
,subdirectory nvarchar(512)
,depth int
,isfile bit);
INSERT#DirectoryTree(subdirectory,depth,isfile)
EXECmaster.sys.xp_dirtree'D:\Backup\TRON4\TEST2\MyDb1',1,1;
SELECT*FROM #DirectoryTree
WHERE isfile = 1 ANDRIGHT(subdirectory,4)='.BAK'
ORDERBYid;
GO
Below is the output.
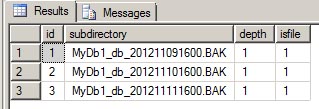
This example only shows the files for a specific subfolder, which is used to get a list of files that are needed for purging before another database backup runs. This stored procedure also can accept UNC paths (\\Server\Folder) to get a list of files and subfolders from a network drive. In a future post, I will add on to this script to show all files in all subfolders for a given directory. Until then, play around with xp_dirtree and its parameters to see the different outputs. You may be able to incorporate this into your own code.
↧
↧
How to Use xp_delete_file to Purge Old Backup Files
Continuing on my recent trend of using undocumented stored procedures, this week I thought we can cover using xp_delete_file to purge old backup files from a folder. This is stored procedure used by the maintenance plans to clean up old backup files, but it makes for a handy purge tool when creating your own backup scripts.
In this example, we want to purge any backup files that are more than one week old and have a file extension of 'BAK'.
Next we just need to add the xp_delete_file after the backup loop completes.
Let's suppose we have a simple script (taken from a recent post on stackoverflow.com) to backup all databases on a server.
DECLARE @name VARCHAR(50);-- Database name
DECLARE @path VARCHAR(256);-- Path for backup files
DECLARE @fileName VARCHAR(256);-- Filename for backup
DECLARE @fileDate VARCHAR(20);-- Used for file name
-- Path to backups.
SET @path ='D:\Backup\';
-- Get date to include in file name.
SELECT @fileDate =CONVERT(VARCHAR(20),GETDATE(),112);
-- Dynamically get each database on the server.
DECLARE db_cursor CURSORFOR
SELECT name
FROMmaster.sys.databases
WHERE name NOTIN('master','model','msdb','tempdb');
OPEN db_cursor;
FETCHNEXTFROM db_cursor INTO @name;
-- Loop through the list to backup each database.
WHILE@@FETCH_STATUS= 0
BEGIN
-- Build the path and file name.
SET @fileName = @path + @name +'_'+ @fileDate +'.BAK';
-- Backup the database.
BACKUPDATABASE@name TODISK= @fileName WITHINIT;
-- Loop to the next database.
FETCHNEXTFROM db_cursor INTO@name;
END
-- Clean up.
CLOSE db_cursor;
DEALLOCATE db_cursor;
GO
The script will create a new database backup file of every database on the server each time it's executed. However, the path may not have unlimited disk space. This is where we need to use xp_delete_file.
Xp_delete_file takes a five parameters:
- File Type = 0 for backup files or 1 for report files.
- Folder Path = The folder to delete files. The path must end with a backslash "\".
- File Extension = This could be 'BAK' or 'TRN' or whatever you normally use.
- Date = The cutoff date for what files need to be deleted.
- Subfolder = 0 to ignore subfolders, 1 to delete files in subfolders.
To incorporate this into our backup script, we just need to add another parameter to define the cutoff date.
DECLARE @DeleteDate DATETIME =DATEADD(wk,-1,GETDATE());
In this example, we want to purge any backup files that are more than one week old and have a file extension of 'BAK'.
Next we just need to add the xp_delete_file after the backup loop completes.
EXECmaster.sys.xp_delete_file0,@path,'BAK',@DeleteDate,0;
We only need to execute xp_delete_file once with subfolder=0 parameter since all backup files are being stored in the same folder. If there was a separate subfolder for each database, then we'd change the subfolder parameter to 1 to delete files from each of those database subfolders.
The updated script would look like this.
DECLARE @name VARCHAR(50);-- Database name
DECLARE @path VARCHAR(256);-- Path for backup files
DECLARE @fileName VARCHAR(256);-- Filename for backup
DECLARE @fileDate VARCHAR(20);-- Used for file name
DECLARE@DeleteDate DATETIME =DATEADD(wk,-1,GETDATE());-- Cutoff date
-- Path to backups.
SET @path ='D:\Backup\';
-- Get date to include in file name.
SELECT @fileDate =CONVERT(VARCHAR(20),GETDATE(),112);
-- Dynamically get each database on the server.
DECLARE db_cursor CURSORFOR
SELECT name
FROMmaster.sys.databases
WHERE name NOTIN('master','model','msdb','tempdb');
OPEN db_cursor;
FETCHNEXTFROM db_cursor INTO @name;
-- Loop through the list to backup each database.
WHILE@@FETCH_STATUS= 0
BEGIN
-- Build the path and file name.
SET @fileName = @path + @name +'_'+ @fileDate +'.BAK';
-- Backup the database.
BACKUPDATABASE@name TODISK= @fileName WITHINIT;
-- Loop to the next database.
FETCHNEXTFROM db_cursor INTO@name;
END
-- Purge old backup files from disk.
EXECmaster.sys.xp_delete_file0,@path,'BAK',@DeleteDate,0;
-- Clean up.
CLOSE db_cursor;
DEALLOCATE db_cursor;
GO
Don't let the stored procedure file name, xp_delete_file, fool you. Microsoft has some internal code that only allows for the deletion of database and transaction log backup files. The stored procedure cannot be used to delete any other type of file.
Yes, it really is that simple.
↧
Get Performance Counters from within SQL Server
I think most DBAs know that you can use the Windows Performance Monitor to capture performance metrics for your SQL Server. But did you know that you also have access to all the SQL Server performance counters from within SQL Server?
![]()
![]()
By using using the DMV sys.dm_os_performance_counters, you can view that performance data. As with all DMVs, there are a few drawbacks. The data collected is only valid since the last time SQL Server was started, and this DMV does not allow access to any of the Window OS performance counters.
For example, we can query the DMV to find the Page Life Expectancy.
SELECT*FROMsys.dm_os_performance_counters
WHERE object_name='MSSQL$TEST1:Buffer Manager'
ANDcounter_name ='Page life expectancy';

The DMV returns five columns:
- object_name - Category of the counter.
- counter_name - Name of the counter.
- instance_name - Name of a specific instance of the counter. For example, the database name.
- cntr_value - The current value of the counter.
- cntr_type - The type of the counter and will vary depending on the Windows architecture.
For this example, the counter value is 3074 which means a data page will stay in the buffer pool for 3074 seconds before being removed. The cntr_type is very important for each of the counters. A type of 65792 is PERF_COUNTER_LARGE_ROWCOUNT which means the cntr_value is the absolute meaning and no more calculations are needed.
Now let's looks at another one that does require extra calculations.
SELECT*FROMsys.dm_os_performance_counters
WHERE object_name='MSSQL$TEST1:Latches'
ANDcounter_name LIKE'Average Latch Wait Time%';

The Average Latch Wait Time (ms) is type 1073874176 - PERF_AVERAGE_BULK. This is essentially the same as the total wait time for all latches. The Average Latch Wait Time Base is type 1073939712 - PERF_LARGE_ROW_BASE. It's the number of processes that had to wait for a latch. In order to find the true "average" wait time, you will need to divide the "Average Latch Wait Time (ms)" by its base value. In this case, 16296/378 = 43.1ms.
For more information about all the counter type definitions, check out MSDN.
As you can see, there is wealth of information within this DMV, but you need to understand the types of each counter and don't just look at the overall value.
↧
T-SQL Terminator
You may have noticed in my code examples, I always include a semicolon ";" at the end of my TSQL statements. If you're not doing this, then you need to start now. Actually, if you're not writing TSQL code as a DBA then you need to start now.
Starting in SQL Server 2005, Microsoft introduced the TSQL terminator. This syntax is not required for most statements, but at some point in the future it will be required for all. You can read the details on MSDN. As with all new changes to SQL, you should be future-proofing your code.
Some statements already require the use of the terminator. One of the best examples is the use of a Common Table Expression (CTE). If you attempt to run this code below, you will get a syntax error.
USEAdventureWorks2008R2
WITH CTE
AS (
SELECT
P.FirstName
,P.LastName
,E.VacationHours
FROM HumanResources.Employee E
JOIN Person.Person P
ON E.BusinessEntityID = P.BusinessEntityID
)
SELECT*FROM CTE
WHEREVacationHours > 40;
GO
Msg 319, Level 15, State 1, Line 3
Incorrect syntax near the keyword 'with'. If this statement is a common table expression, an xmlnamespaces clause or a change tracking context clause, the previous statement must be terminated with a semicolon.
To start defining a CTE, the WITH statement must be the first statement in a batch or the preceding statement must be terminated with a semicolon, even if it's something as simple as a USE DATABASE statement.
Add the semicolon to the end of the USE statement and rerun, and you'll get the results without any errors.
USEAdventureWorks2008R2;
WITH CTE
AS (
SELECT
P.FirstName
,P.LastName
,E.VacationHours
FROM HumanResources.Employee E
JOIN Person.Person P
ON E.BusinessEntityID = P.BusinessEntityID
)
SELECT*FROM CTE
WHEREVacationHours > 40;
GO
(178 row(s) affected)
This is one of the easiest code changes you can make, so starting adding it to your code today and save yourself the hassle of rewriting it tomorrow.
↧
SQL Saturday #143 - Washington, DC
Last week, I attended my very first SQL Saturday event in Washington, DC. Although I don't live anywhere near Washington, I was able to make the short trek from Charlotte, NC. It was well worth the time and effort. I missed the previous one in Charlotte back in October, but I have to say now I really hate that I did. I've been to SQL Connections in Las Vegas, and SQL Saturday reminded me of a one-day version of it. I wish I could have attended every single session, but at least I was able to hear the presentations that I most interested in.
I was able to meet a few of the SQL experts (Mike Walsh, David Klee, Jason Hall, etc.) that I've been following through their blogs and on Twitter. Hearing them speak and being able to converse with them 1-on-1 was surreal.
For any aspiring DBA out there, if SQL Saturday is in your area it should be a mandatory event on your calendar. They are free, except for lunch, and it provides an excellent opportunity to see how others in the industry are using the technology. Beyond listening to the speakers, there is the networking aspect. I met with other attendees, presenters, and of course the vendors to ask questions about SQL or where I could find more information a specific topic. I probably collected a dozen business cards for people and I plan to keep in touch with them.
Check out SQL Saturday's site for a list of all the upcoming events. If there are not any close to you, then check PASS for any local SQL Server user groups in your area. Getting involved in those can provide the same opportunities as SQL Saturday events.
↧
↧
How to Use xp_dirtree to List All Files in a Folder - Part 2
In a previous blog post, I demonstrated how you can use an undocumented stored procedure, master.sys.xp_dirtree, to list all files in a folder. The previous posting mostly talked about how the stored procedure worked and the output it generated. For this posting, I have expanded upon the script to parse all subdirectories and list all files in all subfolders from the starting point.
Just for a quick review, xp_dirtree has three parameters:
- directory - This is the directory you pass when you call the stored procedure; for example 'D:\Backup'.
- depth - This tells the stored procedure how many subfolder levels to display. The default of 0 will display all subfolders.
- isfile - This will either display files as well as each folder. The default of 0 will not display any files.
DECLARE
@BasePath varchar(1000)
,@Path varchar(1000)
,@FullPath varchar(2000)
,@Id int;
--This is your starting point.
SET @BasePath ='D:\Backup';
--Create a temp table to hold the results.
IFOBJECT_ID('tempdb..#DirectoryTree')ISNOTNULL
DROPTABLE#DirectoryTree;
CREATETABLE #DirectoryTree(
id intIDENTITY(1,1)
,fullpath varchar(2000)
,subdirectory nvarchar(512)
,depth int
,isfile bit);
--Create a clustered index to keep everything in order.
ALTERTABLE #DirectoryTree
ADDCONSTRAINT PK_DirectoryTree PRIMARYKEYCLUSTERED (id);
--Populate the table using the initial base path.
INSERT#DirectoryTree(subdirectory,depth,isfile)
EXECmaster.sys.xp_dirtree@BasePath,1,1;
UPDATE#DirectoryTree SET fullpath = @BasePath;
--Loop through the table as long as there are still folders to process.
WHILEEXISTS(SELECT id FROM #DirectoryTree WHEREisfile = 0)
BEGIN
--Select the first row that is a folder.
SELECTTOP (1)
@Id = id
,@FullPath = fullpath
,@Path = @BasePath +'\'+ subdirectory
FROM #DirectoryTree WHERE isfile = 0;
IF @FullPath = @Path
BEGIN
--Do this section if the we are still in the same folder.
INSERT #DirectoryTree(subdirectory,depth,isfile)
EXECmaster.sys.xp_dirtree@Path,1,1;
UPDATE #DirectoryTree
SET fullpath = @Path
WHERE fullpath ISNULL;
--Delete the processed folder.
DELETEFROM #DirectoryTree WHEREid = @Id;
END
ELSE
BEGIN
--Do this section if we need to jump down into another subfolder.
SET @BasePath = @FullPath;
--Select the first row that is a folder.
SELECTTOP (1)
@Id = id
,@FullPath = fullpath
,@Path = @BasePath +'\'+ subdirectory
FROM #DirectoryTree WHERE isfile = 0;
INSERT #DirectoryTree(subdirectory,depth,isfile)
EXECmaster.sys.xp_dirtree@Path,1,1;
UPDATE #DirectoryTree
SET fullpath = @Path
WHERE fullpath ISNULL;
--Delete the processed folder.
DELETEFROM #DirectoryTree WHEREid = @Id;
END
END
--Output the results.
SELECT fullpath +'\'+ subdirectory AS'CompleteFileList'
FROM#DirectoryTree
ORDERBY fullpath,subdirectory;
--Cleanup.
IFOBJECT_ID('tempdb..#DirectoryTree')ISNOTNULL
DROPTABLE#DirectoryTree;
GO
This code will process one folder level at a time since we're specifying 1 for the depth parameter. For each folder in the #DirectoryTree table, we get a list of files and subfolders and insert it to the #DirectoryTree table.
INSERT#DirectoryTree(subdirectory,depth,isfile)
EXECmaster.sys.xp_dirtree@Path,1,1;
If it's a folder, then it the file parameter will be 0 and the WHILE loop will process once it gets further down the loop. The folder needs a clustered index to keep all the rows in order.
ALTERTABLE #DirectoryTree
ADDCONSTRAINT PK_DirectoryTree PRIMARYKEYCLUSTERED (id);
After each folder is processed, the folder row is deleted from the table. This is necessary so the WHILE loop doesn't turn into an infinite loop.
DELETEFROM #DirectoryTree WHEREid = @Id;
The full path is being saved for output later, so comparing it to the current base path will let us know if we need to update the @BasePathparameter.
IF @FullPath = @Path
--Continue processing the same folder.
ELSE
SET @BasePath = @FullPath;
--Start processing the next subfolder.
This is how we can keep looping through each subfolder until each one has been processed.
The final step is to output the results.
![]()
The final step is to output the results.
SELECT fullpath +'\'+ subdirectory AS'CompleteFileList'
FROM#DirectoryTree
ORDERBY fullpath,subdirectory;

I have gotten pretty good performance out of this script. Even traversing the C:\Windows folder on my test VM, I can get the report to return all 62000+ files in 14000+ folders within about 6 minutes. Hopefully this example will prove to be helpful for your everyday tasks. Enjoy!
↧
SQL Server has encountered % occurence(s) of cachestore flush for the % cachestore (part of plan cache) due to some database maintenance or reconfigure operations
Have you seen this type of an informational message in your SQL errorlog before? If so, then I hope the timestamp associated with it was not during the middle of your peak processing time. This is a good indication that someone has been tinkering with some of the SQL configuration settings.
![]()
![]()
SQL Server offers a lot of wonderful configuration options; many of which can be changed dynamically using sp_configure without the need of restarting the SQL Server service. The downside to the dynamic changes is sometimes they can have a detrimental effect on performance, and that's what this "informational" message is tell you. Let's look at an example.
First, let's get our starting numbers for the cachestores.
SELECT
COUNT(*)AS'Total Cached Plans'
FROMsys.dm_exec_cached_plans
GO
SELECT
name AS'Cache Name'
,single_pages_kb
,multi_pages_kb
,entries_count
FROMsys.dm_os_memory_cache_counters
WHERE name IN('Object Plans','SQL Plans','Bound Trees')
GO

As you can see, we have 160 total plans in cache using up the amount of single and multi-page allocations for each entry.
Now let's say your system administrator came to you today and said he hot-added extra ram to the SQL box because of how much you had been complaining about memory shortages. You are so excited about this, you login to the server and execute the following query to bump SQL's maximum memory up to 4GB.
EXECsys.sp_configureN'max server memory (MB)',N'4000'
GO
RECONFIGURE
GO
Now you look in the SQL errorlog to valid the changes.
You are excited to see this message.
Configuration option 'max server memory (MB)' changed from 2000 to 4000. Run the RECONFIGURE statement to install.
And not so excited about these.
SQL Server has encountered 1 occurrence(s) of cachestore flush for the 'Object Plans' cachestore (part of plan cache) due to some database maintenance or reconfigure operations.
SQL Server has encountered 1 occurrence(s) of cachestore flush for the 'SQL Plans' cachestore (part of plan cache) due to some database maintenance or reconfigure operations.
SQL Server has encountered 1 occurrence(s) of cachestore flush for the 'Bound Trees' cachestore (part of plan cache) due to some database maintenance or reconfigure operations.
Let's run our cachestore query again and look at the results.

Ah proof that we just cleared the entire procedure cache. Having these cachestores cleared out means you just lost all compiled plans for stored procedures, functions, triggers, views, adhoc plans, prepared plans, etc. The next time any query runs, its plan will have to be compiled costing extra CPU cycles and potentially degraded performance.
As it turns out, for certain configuration settings when you execute the RECONFIGURE command it essentially does what amounts to DBCC FREEPROCCACHE.
The whole procedure cache is cleared if one of the following server options is changed by the RECONFIGURE statement:
The whole procedure cache is cleared if one of the following server options is changed by the RECONFIGURE statement:
- cross db ownership chaining
- index create memory (KB)
- remote query timeout (s)
- user options
- max text repl size (B)
- cost threshold for parallelism
- max degree of parallelism
- min memory per query (KB)
- query wait (s)
- min server memory (MB)
- max server memory (MB)
- query governor cost limit
This is a very good example of why you should NOT make configuration changes during peak processing times. You wouldn't run DBCC FREEPROCCACHE during the middle of your peak processing, so why would you play around with configuration settings during that same time?
For further reading: http://support.microsoft.com/kb/917828
↧
Exam 70-432 - SQL Server 2008 Implementation and Maintenance
For years, actually more like a decade, I've been saying that I'm going to get certified in SQL Server. Well finally after years of saying it, I finally did. I passed my first exam, 70-432, this past week. I have to say it was easier and at the same time harder than I thought it would be. Easier, as in the content that was covered in the test was already 2nd nature to me, because I had been doing this stuff for years. And it was harder, because of the way Microsoft asked the questions. Even if you know the concepts behind using a particular feature, you still have to know how to do it. Now I'm on to my next exam, 70-450, Designing and Maintaining a Database Administrative Solution Using Microsoft SQL Server 2008.
You may be wondering why I am spending time getting certified in 2008 instead of going straight for 2012. With the certification retirement date fast approaching on July31, 2013 for the 2008 exam, I thought it would best to get certified in 2008 and then move on to 2012. It's too late for me to get certified in 2000 or 2005, so I wanted to make sure I have certifications from multiple versions.
My wife asked me after I told her that I passed this exam, "What is my end goal?". My answer was to get as many of the SQL Server certifications as I can. By that I mean that I want to be certified at the highest level of in SQL Server. It would be extremely satisfying if I can get to the architect level, but I may not even be able to get to the master level. Only time will tell. No matter what level I finally obtain, I still know that I'll be learning more and more about SQL Server as I go along, and that's the REAL end goal.
↧
sp_PerformanceCounters - Get a Health Check of SQL Server's Performance
During your career as a DBA, you'll run across articles by SQL experts or other DBAs that just give you an idea. A few years ago I found an article, or a poster to be more precise, that explains SQL Server performance counters. It was written by Kevin Kline, Brent Ozar, Christian Bolton, Bob Ward, Rod Colledge, and Raoul Illyaos.
![]()
I was thinking this would be a nice poster for any DBA to hang up in their cubical. But as I read down near the bottom, I saw they also mentioned getting performance counters from within SQL Server via sys.dm_os_performance_counters. Ah ha! My light bulb just turned on!
In an earlier post, I had discussed how to get performance counters from within SQL Server, so for this post I want to share a stored procedure that pulls the counters as described in the poster as well a few more.
The procedure is sp_PerformanceCounters, and it will aggregate overall performance data that is available in the sys.dm_os_performance_countersDMV. The metrics are gathered for various counters and objects and displayed in 7 columns.
- PerformanceObject - The counter category.
- CounterName - Name of the counter.
- InstanceName - The specific instance of the counter; often the database name.
- TimeFrame - The timeframe of the counter.
- ActualValue - The value of the counter.
- IdealValue - A generalized optimal value for the counter.
- Description - A brief description of the counter.
For the TimeFrames that are "Current", those are counter type 65792 and are the absolute values that do not need any special definition. For example, you can select the number of database pages in the buffer pool, and the value returned is the current value.
![]()
SELECT * FROMsys.dm_os_performance_counters
WHEREobject_name='MSSQL$TEST1:Buffer Manager'
ANDcounter_name ='Database Pages';

The second TimeFrame "Total since SQL startup" is also easy to interpret. This counter is also of type 65792, and it's just the accumulated total of a counter since SQL was started up. For example, you can select the number of log growths from the databases counter which would tell you the total number of log growths for all databases since SQL Server was last started.
![]()
SELECT*FROMsys.dm_os_performance_counters
WHEREobject_name='MSSQL$TEST1:Databases'
ANDcounter_name ='Log Growths'
ORDERBY instance_name;

The last and most common TimeFrame is "Avg since SQL startup", which is for counters of type 272696576. The value of these counters get incremented every time that event is fired and are mostly related to "per second" counters. To figure out the per second value we have to divide by the total uptime (in seconds) of SQL Server. This will give us the output displayed in the ActualValue column. This is also one reason why the SQL Server startup time is the first row displayed in the output. The SQL Server startup time is taken from the sys.dm_os_sys_infoDMV.
![]()
SELECT*FROMsys.dm_os_performance_counters
WHEREobject_name='MSSQL$TEST1:SQL Statistics'
ANDcounter_name ='Batch Requests/sec';

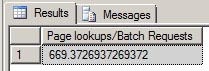
Most counter names will match exactly what you see in sys.dm_os_performance_counters; however, there will be a few that are calculated as a ratio. One example is the Page Lookup / Batch Request. This counter will show you the average number page lookups that occurred per batch request. Both of these individual counters are of type 272696576 which means they are "per second counters". However, for this ratio counter we don't care about the per second value, we just want total of Page Lookups divided by the total of Batch Requests.
DECLARE@TempValue1 DECIMAL(25,5), @TempValue2 DECIMAL(25,5)
SELECT@TempValue1 = cntr_value
FROMsys.dm_os_performance_counters
WHEREobject_name='MSSQL$TEST1:Buffer Manager'
ANDcounter_name ='Page lookups/sec';
SELECT@TempValue2 = cntr_value
FROMsys.dm_os_performance_counters
WHEREobject_name='MSSQL$TEST1:SQL Statistics'
ANDcounter_name ='Batch Requests/sec';
-- This is to avoid divide by zero.
IF@TempValue2 <> 0
SELECT@TempValue1/@TempValue2 AS'Page lookups/Batch Requests';
ELSE
SELECT 0;
All aggregated data is stored in a temporary table #PerformanceCounters and then displayed at the end, and is best viewed using the "Results to Grid" output in SSMS.
![]()
EXECmaster.dbo.sp_PerformanceCounters;
GO

Most of the ideal values and descriptions were taken from the poster mentioned above. My disclaimer with that is the real ideal value will always depend on your specific application and setup. This stored procedure was created to be used an overall health check for a server. It's especially useful if another DBA just handed you a new SQL Server to support, and you need a quick way to see a brief history of its performance.
The stored procedure was written for SQL Server 2005 and 2008. It will work on SQL Server 2012, but there were a lot of changes with the counters so I will have an updated officially supported version for 2012 soon.
↧
↧
How to Remove (Undo) Table Partitioning
I have seen plenty of articles and blog posts out there for how to setup and implement table partitioning, but very few for removing or undoing it. So I thought I would cover a few ways to accomplish this while still preserving the data.
![]()
![]()
![]()
Since we have a partitioned clustered index, we can remove partitioning from this table by simply executing a single statement; CREATE INDEX using the DROP_EXISTING option and specifying a different filegroup. This will drop the current partitioned index (which includes the data) and recreate it on the PRIMARY filegroup all within a single command.
![]()
![]()
![]()
![]()
![]()
Before:
![]()
After:
![]()
![]()
There could be many reasons for removing partitioning: no longer needed, need to change partitioned tables, etc. But for our example, we just want to completely remove it from all tables. It would be nice if we could just drop the partition function and partition schema and SQL Server would handle all the rest, but it just isn't that simple and that's why DBAs were created.
The Problem - We have two partitioned tables (PartitionTable1 & PartitionTable2) split across four filegroups. We need to remove partitioning from the tables, remove the four files and filegroups, and then move all data to the PRIMARY filegroup without losing any data.
Sample Database - Start by creating a test database with a few filegroups and add some data files to those filegroups.
USEmaster;
GO
-- Create a test database.
CREATEDATABASEPartitionTest
ONPRIMARY (
NAME=N'PartitionTest'
,FILENAME=N'D:\MSSQL11.TEST1\MSSQL\DATA\PartitionTest.mdf'
,SIZE= 25MB,FILEGROWTH= 25MB)
LOGON (
NAME=N'PartitionTest_log'
,FILENAME=N'D:\MSSQL11.TEST1\MSSQL\DATA\PartitionTest_log.ldf'
,SIZE= 25MB,FILEGROWTH= 25MB);
GO
USEPartitionTest;
GO
-- Add four new filegroups to the PartitionTest database.
ALTERDATABASEPartitionTestADDFILEGROUPPartitionFG1;
GO
ALTERDATABASEPartitionTestADDFILEGROUPPartitionFG2;
GO
ALTERDATABASEPartitionTestADDFILEGROUPPartitionFG3;
GO
ALTERDATABASEPartitionTestADDFILEGROUPPartitionFG4;
GO
-- Adds one file for each filegroup.
ALTERDATABASEPartitionTest
ADDFILE
(
NAME=PartitionFile1,
FILENAME='D:\MSSQL11.TEST1\MSSQL\DATA\PartitionFile1.ndf',
SIZE= 25MB,MAXSIZE= 100MB,FILEGROWTH= 5MB
)
TOFILEGROUPPartitionFG1;
GO
ALTERDATABASEPartitionTest
ADDFILE
(
NAME=PartitionFile2,
FILENAME='D:\MSSQL11.TEST1\MSSQL\DATA\PartitionFile2.ndf',
SIZE= 25MB,MAXSIZE= 100MB,FILEGROWTH= 5MB
)
TOFILEGROUPPartitionFG2;
GO
ALTERDATABASEPartitionTest
ADDFILE
(
NAME=PartitionFile3,
FILENAME='D:\MSSQL11.TEST1\MSSQL\DATA\PartitionFile3.ndf',
SIZE= 25MB,MAXSIZE= 100MB,FILEGROWTH= 5MB
)
TOFILEGROUPPartitionFG3;
GO
ALTERDATABASEPartitionTest
ADDFILE
(
NAME=PartitionFile4,
FILENAME='D:\MSSQL11.TEST1\MSSQL\DATA\PartitionFile4.ndf',
SIZE= 25MB,MAXSIZE= 100MB,FILEGROWTH= 5MB
)
TOFILEGROUPPartitionFG4;
GO
Create our partition function and then our partition scheme.
-- Creates a partition function called myRangePF1 that will partition a table into four partitions
CREATEPARTITIONFUNCTIONmyRangePF1(int)
ASRANGELEFTFORVALUES (500, 1000, 1500);
GO
-- Creates a partition scheme called myRangePS1 that applies myRangePF1 to the four filegroups created above
CREATEPARTITIONSCHEMEmyRangePS1
ASPARTITIONmyRangePF1
TO (PartitionFG1,PartitionFG2,PartitionFG3,PartitionFG4);
GO
Create the partitioned tables on the partition scheme; one (PartitionTable1) with a clustered index and one (PartitionTable2) with a non-clustered index.
-- Creates a partitioned table called PartitionTable1 with a clustered index
CREATETABLEPartitionTable1(col1intIDENTITY(1,1),col2datetime,col3char(8000))
ONmyRangePS1(col1);
GO
CREATECLUSTEREDINDEX[PK_col1]ON[dbo].[PartitionTable1]
([col1]ASC)ON[myRangePS1]([col1]);
GO
-- Creates a partitioned table called PartitionTable2 with a nonclustered index
CREATETABLEPartitionTable2(col1intIDENTITY(1,1),col2datetime,col3char(8000))
ONmyRangePS1(col1);
GO
CREATENONCLUSTEREDINDEX[IX_col2]ON[dbo].[PartitionTable2]
([col1],[col2]ASC)ON[myRangePS1]([col1]);
GO
Now add 2000 rows of dummy data to each table. The random date generator code is courtesy of Latif Khan.
-- Insert dummy data.
INSERTPartitionTable1(col2,col3)
SELECT CAST(CAST(GETDATE()ASINT)-2000 *RAND(CAST(CAST(NEWID()ASBINARY(8))ASINT))ASDATETIME),REPLICATE('1',8000);
GO 2000
INSERTPartitionTable2(col2,col3)
SELECT CAST(CAST(GETDATE()ASINT)-2000 *RAND(CAST(CAST(NEWID()ASBINARY(8))ASINT))ASDATETIME),REPLICATE('2',8000);
GO 2000
Let's query the sys.partitions table and see what we have created.
-- Get partition information.
SELECT
SCHEMA_NAME(t.schema_id)ASSchemaName
,OBJECT_NAME(i.object_id)ASObjectName
,p.partition_numberASPartitionNumber
,fg.nameASFilegroup_Name
,rowsAS'Rows'
,au.total_pagesAS'TotalDataPages'
,CASEboundary_value_on_right
WHEN 1 THEN'less than'
ELSE'less than or equal to'
ENDAS'Comparison'
,valueAS'ComparisonValue'
,p.data_compression_descAS'DataCompression'
,p.partition_id
FROMsys.partitionsp
JOINsys.indexesiONp.object_id=i.object_idAND p.index_id=i.index_id
JOINsys.partition_schemespsONps.data_space_id=i.data_space_id
JOINsys.partition_functionsfONf.function_id=ps.function_id
LEFTJOINsys.partition_range_valuesrvONf.function_id=rv.function_idANDp.partition_number=rv.boundary_id
JOINsys.destination_data_spacesddsONdds.partition_scheme_id=ps.data_space_idANDdds.destination_id=p.partition_number
JOINsys.filegroupsfgONdds.data_space_id=fg.data_space_id
JOIN(SELECTcontainer_id,sum(total_pages)astotal_pages
FROMsys.allocation_units
GROUPBYcontainer_id)ASauONau.container_id=p.partition_id
JOINsys.tablestONp.object_id=t.object_id
WHEREi.index_id<2
ORDERBYObjectName,p.partition_number;
GO
Here we can see both PartitionTable1 and PartitionTable2 are evenly split with 500 rows in each of the four partitions and each in a separate filegroup.

Within SSMS, you can also see each table is showing the partition scheme and the four partitions.


Solution for PartitionTable1 - This table has a clustered index which makes our solution pretty easy.
Since we have a partitioned clustered index, we can remove partitioning from this table by simply executing a single statement; CREATE INDEX using the DROP_EXISTING option and specifying a different filegroup. This will drop the current partitioned index (which includes the data) and recreate it on the PRIMARY filegroup all within a single command.
-- Quick and easy way to unpartition and move it.
CREATECLUSTEREDINDEX[PK_col1]
ON[dbo].[PartitionTable]([col1])
WITH (DROP_EXISTING=ON)
ON[PRIMARY];
GO
Now query the sys.partitions DMV again and you will see PartitionTable1 no longer shows up and only PartitionTable2 is remaining.

Once again in SSMS, you can will see PartitionTable1 now resides on the PRIMARY filegroup and its data still remains intact.

Solution for PartitionTable2 - We can't use the previous index trick on the this table because it doesn't have a clustered index. For this solution, we'll need to use a few ALTER commands such as MERGE RANGE, NEXT USED, SPLIT RANGE, and SWITCH.
First we need to use the ALTER PARTITION FUNCTION MERGEcommand to combine all of the four partitions into a single partition. The MERGE RANGE command removes the boundary point between the specified partitions.
-- Merge all partitions into a single partition.
ALTERPARTITIONFUNCTIONmyRangePF1()MERGERANGE (500);
GO
ALTERPARTITIONFUNCTIONmyRangePF1()MERGERANGE (1000);
GO
ALTERPARTITIONFUNCTIONmyRangePF1()MERGERANGE (1500);
GO
Query the sys.partitions DMV again, and you will see that all 2000 rows have been combined, or merged, into a single partition and now reside on the PartitionFG4 filegroup.

Next, we need to use ALTER PARTITION SCHEME NEXT USED to specify the PRIMARY filegroup as the next partition.
-- Create next partition as PRIMARY.
ALTERPARTITIONSCHEMEmyRangePS1NEXTUSED[PRIMARY];
GO
Then we need to use ALTER PARTITION FUNCTION SPLIT RANGEusing a partition value that is larger than the maximum value of your partition column. In our example, since we're doing a RANGE LEFT partition then specifying any value greater than or equal to 2000 will do the trick. The SPLIT RANGEcommand will create a new boundary in the partitioned table.
-- Split the single partition into 2 separates ones to push all data to the PRIMARY FG.
ALTERPARTITIONFUNCTIONmyRangePF1()SPLITRANGE (2000);
GO
Query the sys.partitions DMV once again. You can see that PartitionTable2 is still partitioned into two partitions, but all 2000 rows now reside in the PRIMARYfilegroup.

At this point we're only half way done. Now we need to create a non-partitioned table in the PRIMARY filegroup that matches the PartitionTable2 in every way, including any data types, constraints, etc. This new table will only be used as a temporary holding location for the data.
-- Create a new temporary non-partitioned table.
CREATETABLENonPartitionTable(col1intIDENTITY(1,1),col2datetime,col3char(8000))
ON[PRIMARY];
GO
CREATENONCLUSTEREDINDEX[IX_col2]ON[dbo].[NonPartitionTable]
([col1],[col2]ASC)ON[PRIMARY];
GO
Next we'll use the ALTER TABLE SWITCH command to move the 2000 rows of data into the NonPartitionTable.
-- Switch the partitioned data into the temporary table.
ALTERTABLEPartitionTable2SWITCHPARTITION 1 TONonPartitionTable;
GO
Query the sys.partitions DMV again to see there are now zero rows in the PartitionTable2.

The SWITCH command is very efficient because it's just making a metadata change. Under the covers, no data is actually being moved; it's just reassigning the partition_idof PartitionTable2 to the the NonPartitionTable object_id. If you want to really see the undercover action, then you can run this script before and after the SWITCH command to see the 2000 rows of data never leave the same partition_ids. Our data has never left partition_id 72057594040156160.
SELECT
o.name
,o.object_id
,p.index_id
,p.partition_id
,p.partition_number
,p.rows
FROMsys.objectso
JOINsys.partitionspONo.object_id=p.object_id
WHEREo.nameIN('PartitionTable2','NonPartitionTable')
ORDERBYo.name,p.partition_number
GO
Before:

After:

Now that all the data has been moved to the temporary table, we can drop PartitionTable2 and rename the temporary table back to the original name.
-- Drop the partitioned table.
DROPTABLEPartitionTable2;
GO
-- Rename the temporary table to the original name.
EXECsp_rename'dbo.NonPartitionTable','PartitionTable2','OBJECT';
GOAt this point the PartitionTable2 is no longer partitioned.

Partitioning has now been completely removed from both PartitionTable1 and PartitionTable2. We can drop the remaining parts (partition schema, partition function,files, and filegroups) of partitioning to complete the clean up.
-- Remove the partition scheme, function, files, and filegroups.
DROPPARTITIONSCHEMEmyRangePS1;
GO
DROPPARTITIONFUNCTIONmyRangePF1;GO
ALTERDATABASE[PartitionTest]REMOVEFILEPartitionFile1;
ALTERDATABASE[PartitionTest]REMOVEFILEPartitionFile2;
ALTERDATABASE[PartitionTest]REMOVEFILEPartitionFile3;
ALTERDATABASE[PartitionTest]REMOVEFILEPartitionFile4;
GO
ALTERDATABASE[PartitionTest]REMOVEFILEGROUPPartitionFG1;
ALTERDATABASE[PartitionTest]REMOVEFILEGROUPPartitionFG2;
ALTERDATABASE[PartitionTest]REMOVEFILEGROUPPartitionFG3;
ALTERDATABASE[PartitionTest]REMOVEFILEGROUPPartitionFG4;
GO
What we're left with is a completely un-partitioned database, and all rows of data in each table completely intact.
For further reading on table partitioning, see Books Online.
↧
What is DBCC SHOW_STATISTICS Telling Me About My Data?
Per Books Online, DBCC SHOW_STATISTICS displays current query optimization statistics for a table or indexed view. Basically it shows you the statistics, or a summary of the data, that SQL Server will use to help generate an execution plan.
![]()
![]()
![]()
![]()
![]()
![]()
![]()
![]()
In the example below, we'll be looking at the statistics for the index IX_Person_LastName_FirstName_MiddleName, which is a non-clustered index on the Person.Person table in the AdventureWorks2012 database. We'll cover several queries you can run against your data to help you visualize what the statistics are telling you about your data.
Before we dive into the example, we need to update the statistics with a full scan on this index. This will make sure the details in the example match our queries exactly.
UPDATE STATISTICSPerson.PersonIX_Person_LastName_FirstName_MiddleNameWITHFULLSCAN;
DBCC SHOW_STATISTICS returns three sections of information: the header, the density vector, and the histogram. The first section is the statistics header.
DBCCSHOW_STATISTICS('Person.Person','IX_Person_LastName_FirstName_MiddleName')WITHSTAT_HEADER;

The statistics header returns meta data about the statistic. For example, the date it was created or last updated, number of rows in the table or indexed view, the number rows used to calculate the statistic, etc.
The second section is the density vector.
DBCCSHOW_STATISTICS('Person.Person','IX_Person_LastName_FirstName_MiddleName')WITHDENSITY_VECTOR;

The density vector is representation of how many unique values are present within a column or columns of the statistic. Simply put it's 1/# of distinct values. Our example has 4 levels for the density vector; one for each of the three key columns, plus one that includes the clustered index. To see how SQL Server calculates the values for each of these four levels, we can use the following queries.
--Level 1
SELECTCONVERT(DECIMAL(15,12),1.0/COUNT(DISTINCTLastName))AS'Level1'
FROMPerson.Person;
GO
--Level 2
SELECTCONVERT(DECIMAL(15,12),1.0/COUNT(*))AS'Level2'
FROM (SELECTDISTINCT
LastName
,FirstName
FROMPerson.Person)ASDistinctRows;
GO
--Level 3
SELECTCONVERT(DECIMAL(15,12),1.0/COUNT(*))AS'Level3'
FROM (SELECTDISTINCT
LastName
,FirstName
,MiddleName
FROMPerson.Person)ASDistinctRows;
GO
--Level 4
SELECTCONVERT(DECIMAL(15,12),1.0/COUNT(*))AS'Level4'
FROM (SELECTDISTINCT
LastName
,FirstName
,MiddleName
,BusinessEntityID
FROMPerson.Person)ASDistinctRows;
GO

Our values are formatted to display the entire number, but DBCC SHOW_STATISTICS will use the E notation to shorten number to 5.124001E-05. This notation just means take 5.124001 * 10-5, or an easier explanation would be to move the decimal place 5 spaces to the left. As you can see, our numbers nearly match what is returned by DBCC SHOW_STATISTICS.
The third section of information is the histogram.
DBCCSHOW_STATISTICS('Person.Person','IX_Person_LastName_FirstName_MiddleName')WITHHISTOGRAM;
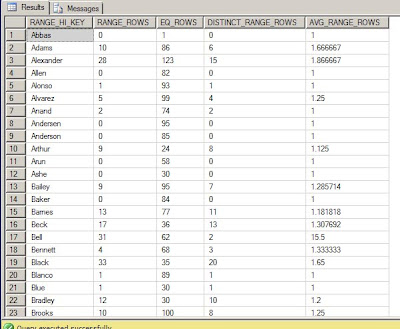
The histogram returns information about the frequency of data within the first key column of the statistic. In our example, we have a composite index of LastName, FirstName, and MiddleName, so the histogram only contains information about the first column, LastName.
- RANGE_HI_KEY - is the upper bound value of the key.
- RANGE_ROWS - is the number of rows who's value falls within the step, but does not equal the upper bound (RANGE_HI_KEY).
- EQ_ROWS - is the number of rows equal to the upper bound.
- DISTINCT_RANGE_ROWS - is the number of distinct values within the histogram step, but does not equal the upper bound (RANGE_HI_KEY).
- AVG_RANGE_ROWS - is the average number of duplicate values within the step, but does not equal the upper bound (RANGE_HI_KEY); calculated as RANGE_ROWS/DISTINCT_RANGE_ROWS.
If we examine the RANGE_HI_KEY value of Adams, we can figure out the exact data rows that fall into this histogram step by looking at these queries.
For the RANGE_ROWS, we need to find all the rows that are greater than the previous RANGE_HI_KEY value, but less than the RANGE_HI_KEY of 'Adams'. This will return the 10 rows that were in the histogram RANGE_ROWS column.
--RANGE_ROWS
SELECT*FROMPerson.Person
WHERELastName>'Abbas'
ANDLastName<'Adams';
GO

For the EQ_ROWS, we just need to find all the rows that are equal to the RANGE_HI_KEY 'Adams'. This will return the 86 rows that were in the histogram EQ_ROWS column.
--EQ_ROWS
SELECT*FROMPerson.Person
WHERELastName='Adams';
GO

For the DISTINCT_RANGE_ROWS, we need to find all the distinct values that are greater than the previous RANGE_HI_KEY but less than the RANGE_HI_KEY of 'Adams'. This will return the 6 rows that were in the DISTINCT_RANGE_ROWS column.
--DISTINCT_RANGE_ROWS
SELECTDISTINCTLastNameFROMPerson.Person
WHERELastName>'Abbas'
ANDLastName<'Adams';
GO

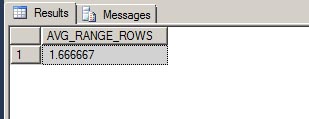
For the AVG_RANGE_ROWS, we need to find the values that are greater than the previous RANGE_HI_KEY but less than the RANGE_HI_KEY of 'Adams', and then divide that by the number of distinct values within the same range. This will return the average value of 1.666667 that was in the AVG_RANGE_ROWS column.
--AVG_RANGE_ROWS
DECLARE
@xDECIMAL(20,6)
,@yDECIMAL(20,6);
SELECT@x=COUNT(LastName)FROMPerson.Person
WHERELastName>'Abbas'
ANDLastName<'Adams';
SELECT@y=COUNT(DISTINCTLastName)FROMPerson.Person
WHERELastName>'Abbas'
ANDLastName<'Adams';
IF@y> 0
SELECTCONVERT(DECIMAL(20,6),@x/@y)AS'AVG_RANGE_ROWS';
GO
As you can see, it's not that hard to see how the statistical information is derived within DBCC SHOW_STATISTICS.
If you would like more detailed information on how statistics are generated and how they help the query optimizer, check out Grant Fritchey's books and blog. He covers a lot of good in-depth information about statistics. And of course Books Online has plenty more information about DBCC SHOW_STATISTICS.
↧
T-SQL Tuesday - Use Powershell to Restore a Database on a Different Server

With that challenge, I'd like to share a script I've written that takes a backup file from one server, copies to another server, and and then restores it. That may sound pretty easy, but I've added in a few requirements to the restore.
Here's the scenario:
We have two SQL Servers, one production (TRON2\R2PROD) and one test (TRON3\R2TEST), and we have one user database (AdventureWorks2008R2) on each of the production and test servers. The test server is used by a developer. The developer send us a request to "refresh the development database with a copy of production". This translates into: he needs the most recent backup of that production database copied from the production server over to the test server, then restored to it by overwriting the existing database, all while preserving his existing dbo level permissions.
The manual approach to completing this task.
- Figure out which full database backup file is the most recent for AdventureWorks2008R2.
- Copy the file from TRON2 to TRON3.
- On TRON3\R2TEST, script out all existing user permissions for the AdventureWorks2008R2 database.
- Restore the backup.
- Run the script from step 3 to reapply the developers permissions.
- Delete the backup file from TRON3.
That many not seem like much time out of your entire workday, but what if that same developer wants you to complete this task each morning at 8AM. Now you're up to 10 minutes per day. And what if he asked you to do it several times a day, every day of the week. That 10 minutes can really add up.
The Powershell approach to completing this task.
- Run the AutoDatabaseRefresh.ps1 script.
Total time to execute this task using Powershell: < 30 seconds.
How's that for performance improvement?
How's that for performance improvement?
The great thing about Powershell is that it allows you to connect to different systems, such as Windows and SQL Server, all from a single programming language. The entire script is written using the SQL Management Objects (SMO). It does not use any of the SQL Server cmdlets, so there are no modules to import. Let's take a closer look.
For this script you need to pass 6 parameters to this script.
- $sourceInstance - Source SQL Server name
- Example: "TRON2\R2PROD"
- Example: "AdventureWorks2008R2"
- Example: "\\TRON2\BACKUP\R2PROD\AdventureWorks2008R2"
- Example: "TRON3\R2TEST"
- Example: "AdventureWorks2008R2"
- Example: "\\TRON3\BACKUP"
The script needs to know both the source and destination SQL Servers (#1 and #4), and the source and destination database names (#2 and #5). The other two parameters are the source paths (#3 and #6) and they must be UNC file shares. This is so the Powershell script can be executed from any server or from any DBA's workstation.
The basic workflow of the Powershell script is as follows:
Step 1: Validate the input parameters. All connectivity to the SQL Servers and to the file shares use Windows Authentication. Tests for blank parameters. Tests the connectivity to each SQL Server. Test that each file share exists. If any of these validation tests fail, the script will halt.
if([String]::IsNullOrEmpty($sourceInstance))
{
Write-Host"ERROR"
$errorMessage="Source server name is not valid."
throw$errorMessage
}Step 2: Connect to $sourceInstance to get the name of the most recent backup file for $sourceDbName. This is accomplished by running this TSQL script.
$server= GetServer($serverInstance)
$db=$server.Databases["msdb"]
$fileList=$db.ExecuteWithResults(
@"
DECLARE
@BackupId int
,@DatabaseName nvarchar(255);
SET @DatabaseName ='$sourceDbName';
-- Get the most recent full backup for this database
SELECTTOP 1
@DatabaseName ASDatabaseName
,m.physical_device_name
,RIGHT(m.physical_device_name,CHARINDEX('\',REVERSE(physical_device_name),1)- 1)AS'FileName'
,b.backup_finish_date
,b.typeAS'BackupType'
FROM msdb.dbo.backupset b JOIN msdb.dbo.backupmediafamily m
ON b.media_set_id = m.media_set_id
WHERE b.database_name =@DatabaseName
AND b.type='D'
AND b.is_snapshot = 0
AND b.is_copy_only = 0
AND b.backup_finish_date ISNOTNULL
ORDERBY b.database_backup_lsn DESC;
"@
This give us the following output.

Step 3: Copy the file from $sourcePath to $destinationPath. From the output above, the physical file, AdventureWorks2008R2_db_201302060836.BAK, is located in D:\Backup\R2PROD\AdventureWorks2008R2, so the $sourcePath must match this location. Our UNC path is \\TRON2\BACKUP\R2PROD\AdventureWorks2008R2. This step uses the Copy-Item cmdlet. In my testing I have seen this cmdlet outperform the regular Windows copy and even Robocopy.
$source=$sourcePath+"\"+$backupFile
Write-Host"Copying file..."
copy-item$source-destination$destinationpPath
Step 4: Connect to $destinationInstance and script out all user-level permissions and database roles for the $destinationDbName. The is accomplished by using the following script.
$server= GetServer($serverInstance)
$db=$server.Databases["$destinationDbName"]
if(-not$db)
{
Write-Host"Database does not exist on: $serverInstance"
}
else
{
Write-Host"Saving permissions on $destinationDbName..."-NoNewline
$commandList=$db.ExecuteWithResults(
@"
IFOBJECT_ID('tempdb..#Commands')ISNOTNULL
DROPTABLE #Commands;
CREATETABLE #Commands(
RowId intidentity(1,1)
,Cmd varchar(2000));
INSERT #Commands(Cmd)
SELECT'USE [$destinationDbName];IF EXISTS (SELECT * FROM sys.database_principals WHERE name = N'+QUOTENAME(d.name,CHAR(39))+') ALTER USER '+QUOTENAME(d.name)+' WITH LOGIN = '+QUOTENAME(s.name)+';'
FROM[$destinationDbName].sys.database_principalsd LEFTOUTERJOINmaster.sys.server_principals s
ON d.sid= s.sid
WHERE s.name ISNOTNULL
AND d.type='S'
AND d.name <>'dbo';
INSERT #Commands(Cmd)
SELECT'USE [$destinationDbName];IF NOT EXISTS (SELECT * FROM sys.database_principals WHERE name = N'+QUOTENAME(d.name,CHAR(39))+') CREATE USER '+QUOTENAME(d.name)+' FOR LOGIN '+QUOTENAME(s.name)+' WITH DEFAULT_SCHEMA = '+QUOTENAME(d.default_schema_name)+';'
FROM[$destinationDbName].sys.database_principalsd LEFTOUTERJOINmaster.sys.server_principals s
ON d.sid= s.sid
WHERE s.name ISNOTNULL
AND d.type='S'
AND d.name <>'dbo';
INSERT #Commands(Cmd)
SELECT'USE [$destinationDbName];IF NOT EXISTS (SELECT * FROM sys.database_principals WHERE name = N'+QUOTENAME(d.name,CHAR(39))+') CREATE USER '+QUOTENAME(d.name)+' FOR LOGIN '+QUOTENAME(s.name)+';'
FROM[$destinationDbName].sys.database_principalsd LEFTOUTERJOINmaster.sys.server_principals s
ON d.sid= s.sid
WHERE s.name ISNOTNULL
AND d.typeIN('U','G');
INSERT #Commands(Cmd)
SELECT'USE [$destinationDbName];IF NOT EXISTS (SELECT * FROM sys.database_principals WHERE name = N'+QUOTENAME(p.name,CHAR(39))+') CREATE ROLE '+QUOTENAME(p.name)+' AUTHORIZATION '+QUOTENAME(o.name)+';'
FROM[$destinationDbName].sys.database_principalsp JOIN [$destinationDbName].sys.database_principalso
ON o.principal_id = p.owning_principal_id
WHERE p.type='R'
AND p.is_fixed_role = 0
AND p.principal_id <>0;
INSERT #Commands(Cmd)
SELECT'USE [$destinationDbName];EXEC sp_addrolemember N'+QUOTENAME(d.name,'''')+', N'+QUOTENAME(m.name,CHAR(39))+';'
FROM[$destinationDbName].sys.database_role_membersr JOIN [$destinationDbName].sys.database_principalsd
ON r.role_principal_id =d.principal_id JOIN[$destinationDbName].sys.database_principalsm
ON r.member_principal_id =m.principal_id
WHERE m.principal_id > 5;
INSERT #Commands(Cmd)
SELECT'USE [$destinationDbName];'+dp.state_desc +' '+ dp.permission_name +' TO '+QUOTENAME(d.name)COLLATE Latin1_General_CI_AS +';'
FROM[$destinationDbName].sys.database_permissionsdp JOIN [$destinationDbName].sys.database_principalsd
ON dp.grantee_principal_id =d.principal_id
WHERE dp.major_id = 0
AND dp.state<>'W'
AND dp.permission_name <>'CONNECT'
ORDERBY d.name, dp.permission_name ASC, dp.state_desc ASC;
INSERT #Commands(Cmd)
SELECT'USE [$destinationDbName];GRANT '+ dp.permission_name +' TO '+QUOTENAME(d.name)COLLATELatin1_General_CI_AS +' WITH GRANT OPTION;'
FROM[$destinationDbName].sys.database_permissionsdp JOIN [$destinationDbName].sys.database_principalsd
ON dp.grantee_principal_id =d.principal_id
WHERE dp.major_id = 0
AND dp.state='W'
AND dp.permission_name <>'CONNECT'
ORDERBY d.name, dp.permission_name ASC, dp.state_desc ASC;
SELECT Cmd FROM #Commands
ORDERBY RowId;
"@
}
This gives us the existing permissions that we'll re-apply later in step 6. You can see we're creating code to resync logins (ALTER USER...WITH LOGIN), create the user if it doesn't exist, create database roles if they don't exist, and add users to those database roles.

Step 5: Restore the backup file to $destinationInstance using the $destinationDbName name. This is the real meat and potatoes of the script.
$restore=new-object ('Microsoft.SqlServer.Management.Smo.Restore')
$restore.Database =$destinationDbName
$restore.NoRecovery =$false
$restore.PercentCompleteNotification = 10
$restore.Devices.AddDevice($backupDataFile, [Microsoft.SqlServer.Management.Smo.DeviceType]::File)
First it checks $destinationInstance to see if $destinationDbName already exists. If it does, then it just restores over it. If $destinationDbName does not exist, then the script will create it using the RESTORE...WITH MOVEcommand. Since the source and destination SQL Servers have different instance names, the file folders for the physical MDF & LDF files will be different. The script uses the default folder locations to store the data and log files. This folders were specified when you installed SQL Server. If the $sourceDbName has several NDF files, all of them will be placed in the default data folder.
$defaultMdf=$server.Settings.DefaultFile
$defaultLdf=$server.Settings.DefaultLog

Before the restore, the script will set the recovery mode of $destinationDbName to SIMPLE. This is avoid the "backup tail log" error message in case the database is in FULL recovery mode. It sets the database to single-user mode to kill any existing connections before the restore. And after the restore is complete, it sets the recovery mode back to SIMPLE.
$db.RecoveryModel =[Microsoft.SqlServer.Management.Smo.RecoveryModel]::Simple
$db.UserAccess ="Single"
$db.Alter(
[Microsoft.SqlServer.Management.Smo.TerminationClause]
"RollbackTransactionsImmediately")
Step 6: Apply the saved permissions from step 4 to $destinationDbName. These are the permissions that were scripted out from step 4. They are applied to the $destinationDbName one line at a time.
foreach($Rowin$commandList.Tables[0].Rows)
{
$db.ExecuteNonQuery($Row["Cmd"])
}
Step 7: Delete the backup from $destinationPath. This is the cleanup step.
remove-item$backupFile
When running the script from a console, the output will look like this.
=============================================================
1: Perform Initial Checks & Validate Input Parameters
=============================================================
Validating parameters...OK
Verifying source SQL Server connectivity...OK
Verifying source database exists...OK
Verifying destination SQL Server connectivity...OK
Verifying source file share exists...OK
Verifying destination file share exists...OK
=============================================================
2: Get Source Backup for the Restore
=============================================================
Connecting to TRON2\R2PROD to find a restore file...
Selected file: D:\Backup\R2PROD\AdventureWorks2008R2\AdventureWorks2008R2_db_201302060836.BAK
Verifying file: \\TRON2\BACKUP\R2PROD\AdventureWorks2008R2\AdventureWorks2008R2_db_201302060836.BAK exists...
Source file existence: OK
=============================================================
3: Copy Backup File to the Destination
=============================================================
Copying file...
Copy file: OK
=============================================================
4: Get Current Permissions on the Destination Database
=============================================================
Saving permissions on AdventureWorks2008R2...OK
=============================================================
5: Restore Backup File to the Destination Server
=============================================================
Restoring database...
Database Restore: OK
=============================================================
6: Restore Permissions to the Destination Database
=============================================================
Restoring existing permissions...
Existing permissions restored: OK
=============================================================
7: Delete Backup File from the Destination Server
=============================================================
Deleting file...
Delete file: OK
=============================================================
Database refresh completed successfully
=============================================================
The best part about using the Powershell script, is you can setup a SQL Agent job to call the script with the parameters already specified. That way when the developer asks you refresh the same database then all you have to do is run the job, or you can work the developer to schedule the job to run automatically each day.

The SQL Agent job will need to setup as an "Operating system (CmdExec)" job type. This is because it uses Powershell components that are outside the normal SQLPS group of commands.
The entire script is below. Feel free to modify it as you see fit for your environment.
↧